
Make a QR menu customers order from
Customers scan the QR on their table and see your menu on their phone, no app to download. They pick dishes, add-ons and spice level, and send the order. It lands in your app with the table number, and they pay with your shop's PromptPay QR for the exact bill amount. The money goes straight to your account, with no per-order fee.
- The owner turns the feature on first in Store settings › Features › Menu. Building the menu is free; publishing it for customers and translating it are part of Premium.
- Scanning a menu photo uses AI. One photo is one AI use (the free plan includes 10 a month), so fit a whole page into one photo where you can.
Building the menu
-
Open the Menu screen
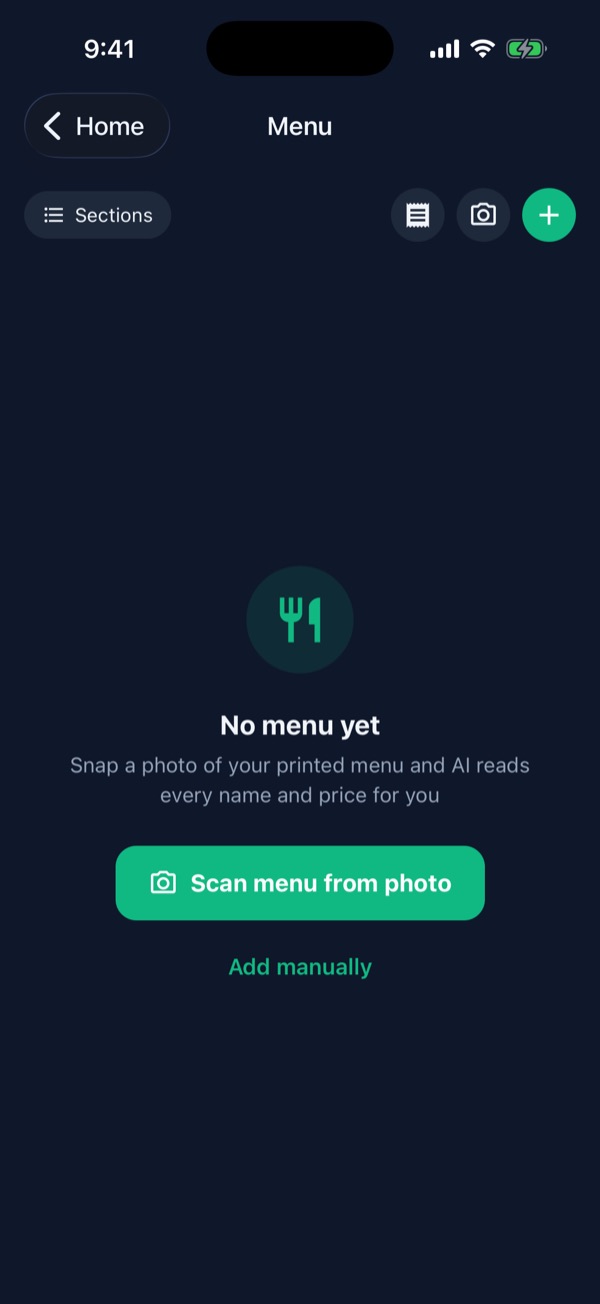
Tap the fork-and-knife icon at the top right of Home, or go to Settings › Menu. The first time it's empty: tap Scan menu from photo 1 and take a photo or choose from your library (pick several if your menu runs to more than one page).
The camera button 2 at the top scans more any time; the green + adds one dish by hand.
-
Check the names and prices the AI read
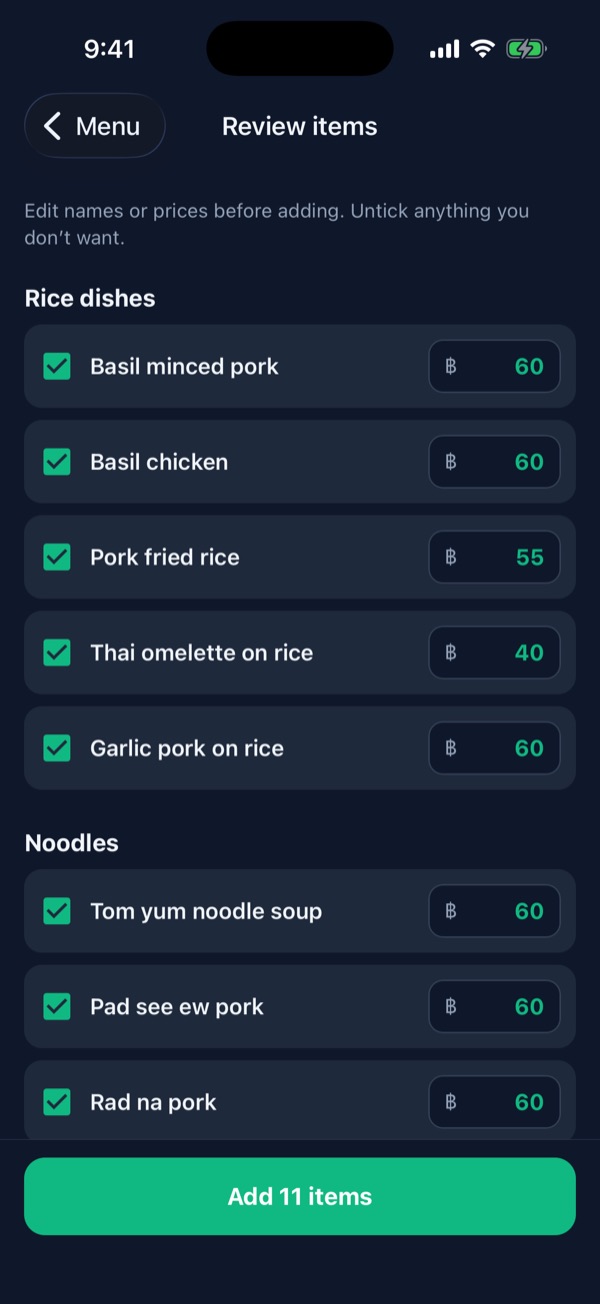
The AI reads every dish name and price on the page and keeps the sections printed on your menu (rice dishes, noodles, drinks). Tap a name or price 1 to fix it, untick anything you don't want, then tap Add n items 2.
In our test the AI read all 11 dishes with the right names and prices, but add-ons listed at the bottom of the menu, like “Fried egg +10”, weren't imported. Add them yourself in the next step. If the AI does read an add-on as a separate dish, untick it.
-
Tap a dish to add the details
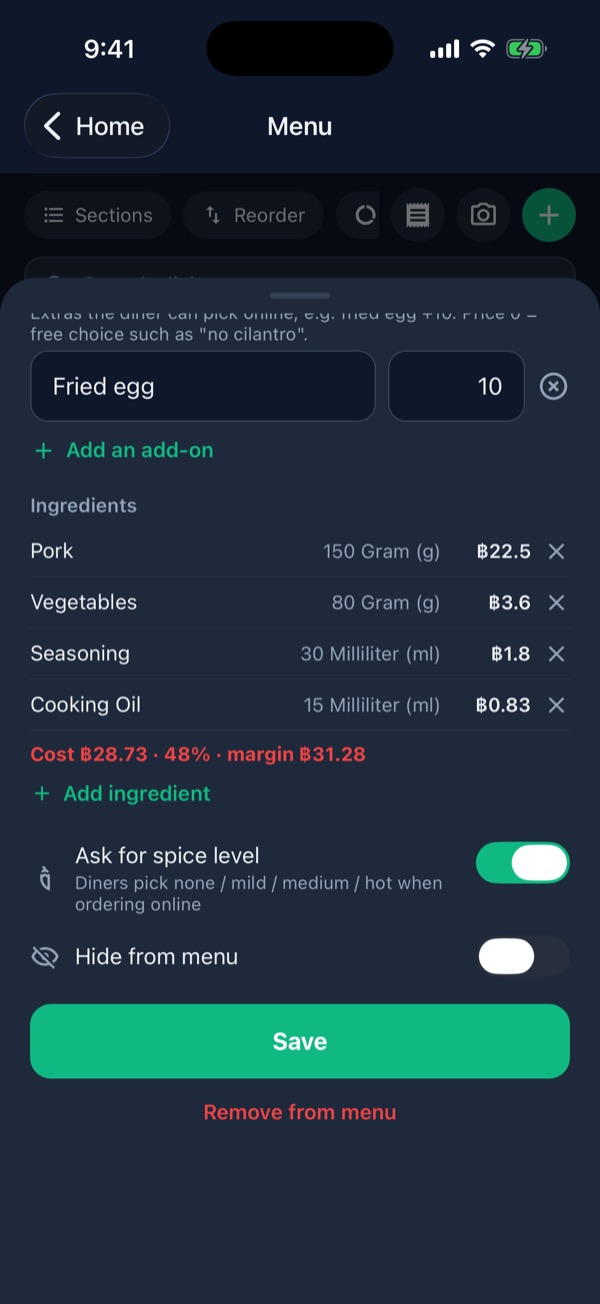
- Add-ons 1, e.g. Fried egg +10. Use price 0 for free choices such as “no cilantro”.
- Ingredients 2: tap Suggest ingredients with AI and the app works out the cost per dish and margin straight away (check the quantities before saving).
- Ask for spice level 3: customers choose no chili / mild / medium / hot themselves.
Add a food photo at the top of the same sheet, then tap Save.
-
Cost per dish appears under the name
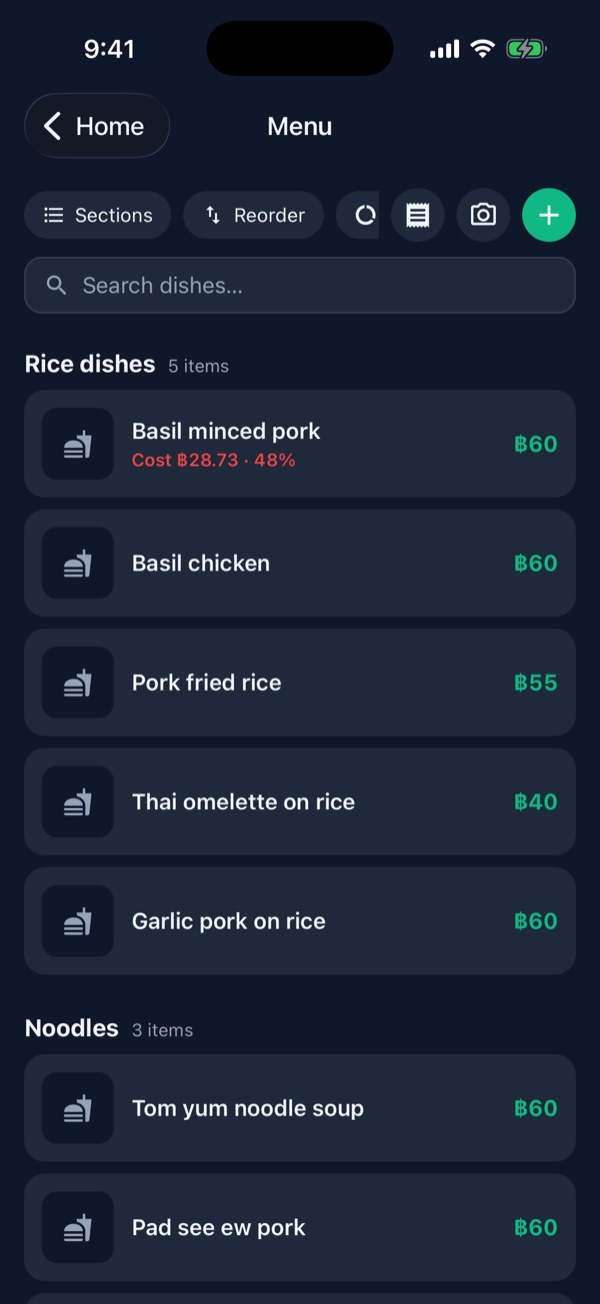
Dishes with ingredients show Cost ฿ · % under the name 1: green up to 30% of the selling price, amber up to 40%, red above 40%.
Here Basil minced pork sells for ฿60 and costs ฿28.73, or 48%. It's red, so it's time to raise the price or cut the cost. Tap Cost in the toolbar to see every dish at once and try out new prices.
⚠️ Costs come from your category pricesIf an ingredient shows Set price, that category has no price per unit yet. Tap it to add one, e.g. pork at ฿150 a kilo (units are covered in Guide 1).
Publishing and printing QR codes
-
Choose your shop's link, then publish
Tap Publish in the Menu toolbar. Set the Menu link 1 to your shop's name in lowercase, e.g.
auntie-daeng(or tap the dice for a random one), then tap Publish menu 2.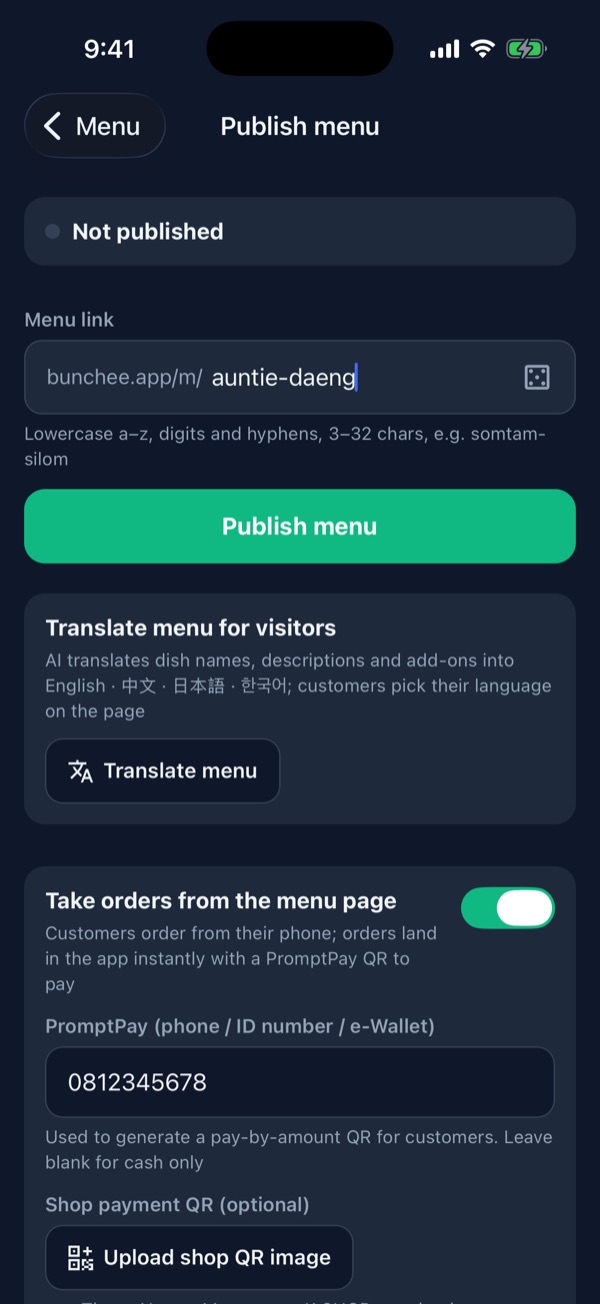
-
Your link and QR are ready
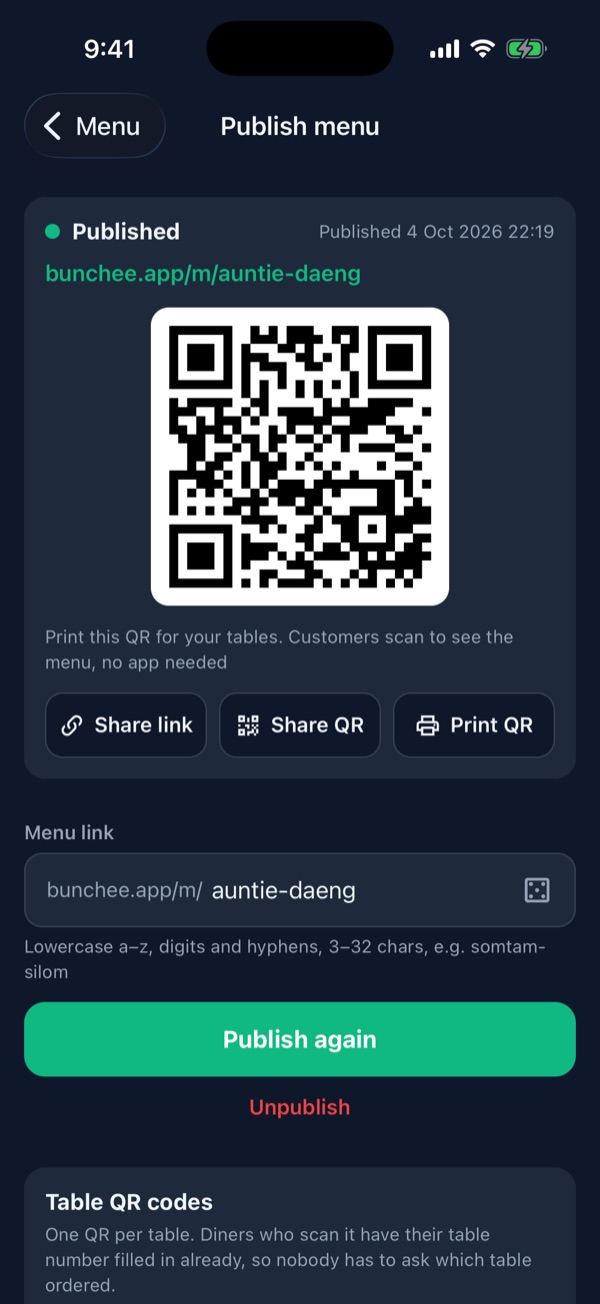
Your shop gets the link bunchee.app/m/your-shop 1 and a QR. Use Share link to post it in your LINE or Facebook, or Print QR 2 for the shop front (great for takeaway).
⚠️ Changed the menu? Tap “Publish again”After you change a price, add a dish or change payment settings, the app shows an amber banner. Customers keep seeing the old menu until you publish again.
-
Table QR codes: know which table ordered
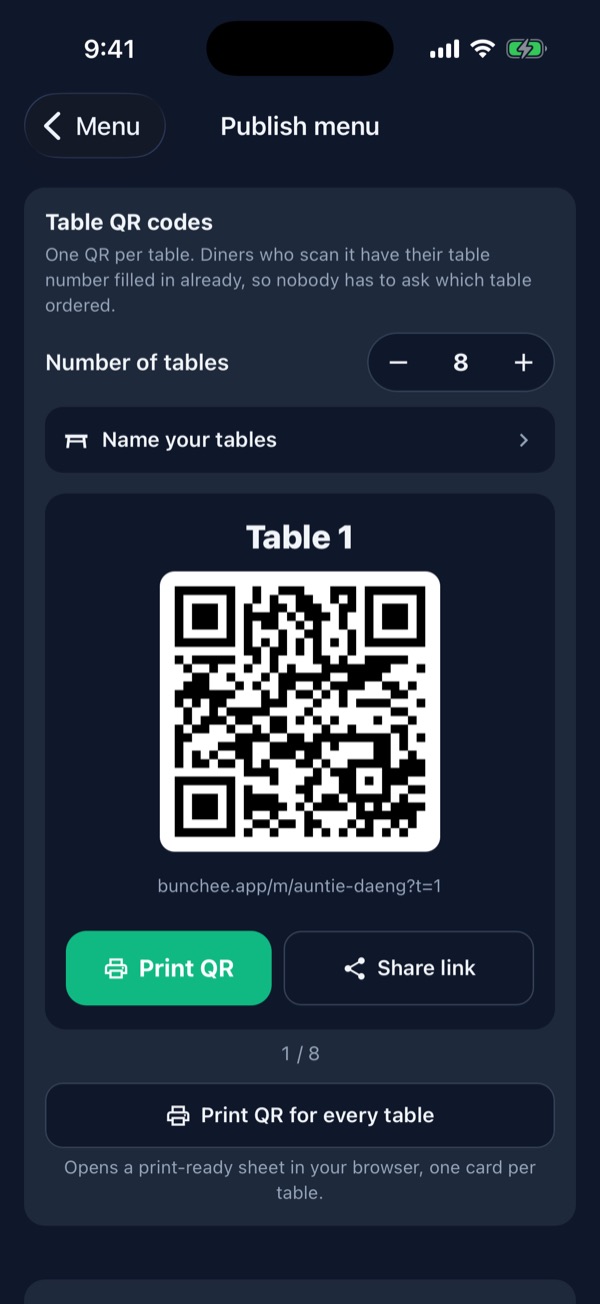
Scroll down to Table QR codes and set the Number of tables 1. Each table gets its own QR, and customers who scan it have the table number filled in automatically, so nobody has to ask.
Tap Print QR for every table 2 for a print-ready sheet, one card per table. Name tables (A1, Riverside…) and colour them by area under Name your tables.
-
Set up payment
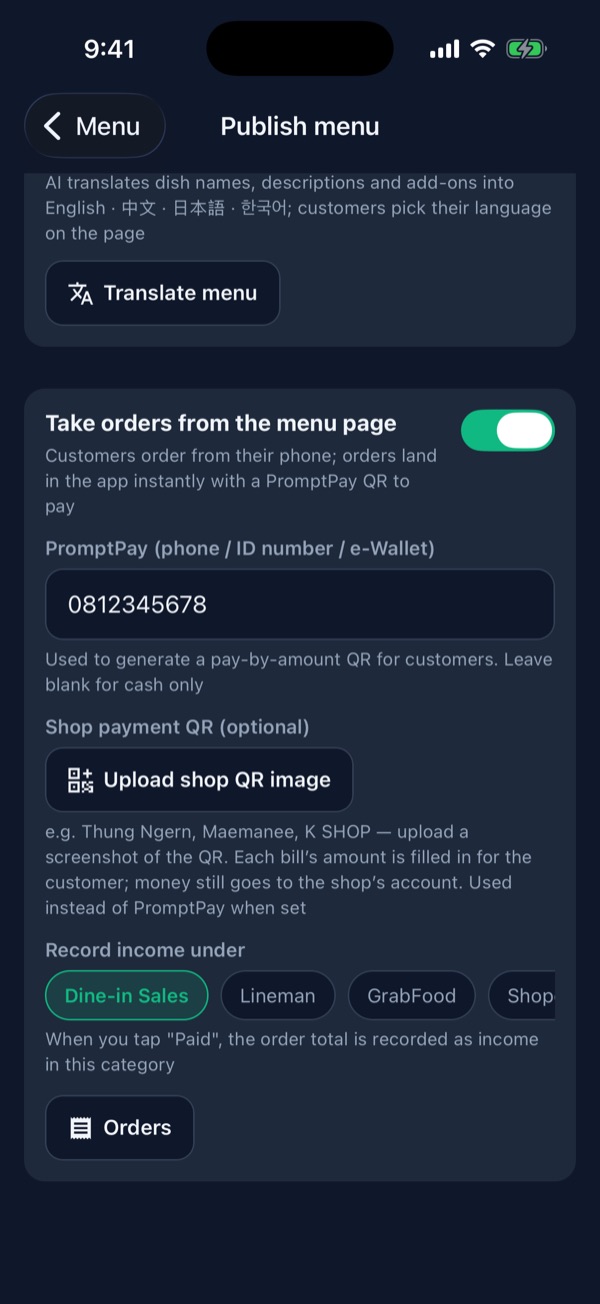
In the Take orders from the menu page card:
- PromptPay 1: a phone number, ID number or e-Wallet. Customers get a QR with the bill amount already filled in (leave it blank for cash only).
- Upload shop QR image 2: use the QR from your banking app (Thung Ngern, Maemanee, K SHOP) instead of PromptPay. Screenshot it and upload.
- Record income under 3: when you tap “Paid”, the order total goes into your books as income in this category, automatically.
-
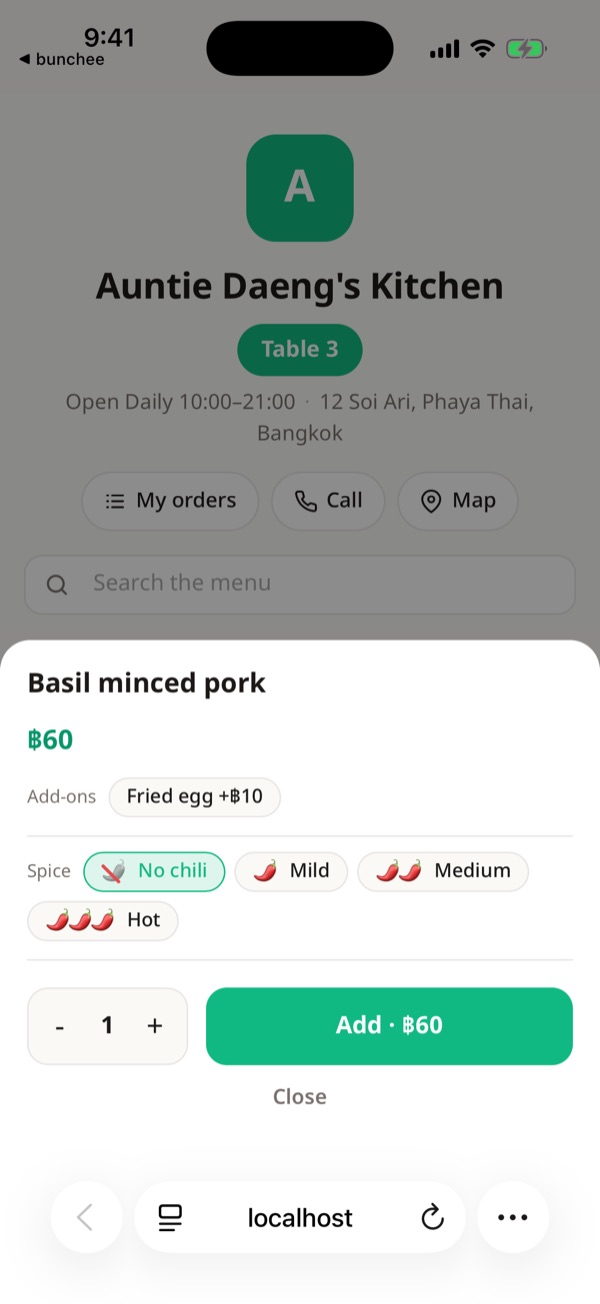
This is what customers see
A customer scans the QR on table 3 and sees Table 3 1 at the top straight away. They tap a dish, pick add-ons 2 and spice 3, and tap Add 4. Once the order is sent they can pay by scanning the PromptPay QR.
Try it yourself on the demo menu on your phone. It's the same page your customers will see.
Getting customers to actually order
- Put the QR where people see it: on every table, at the counter and the shop front, with a short line like “Scan to order, no need to wait for staff”.
- Have staff point it out. Customers aren't used to it at first. Mention it once when they sit down and next time they'll scan on their own.
- Turn on notifications in the app so orders pop up instantly and nobody is left waiting.
- Foreign customers? Tap Translate menu on the Publish screen so customers can switch to English, Chinese, Japanese or Korean (then publish again).